Create a Stunning Gallery Wall: A Guide to Curating Art for Your Living Room
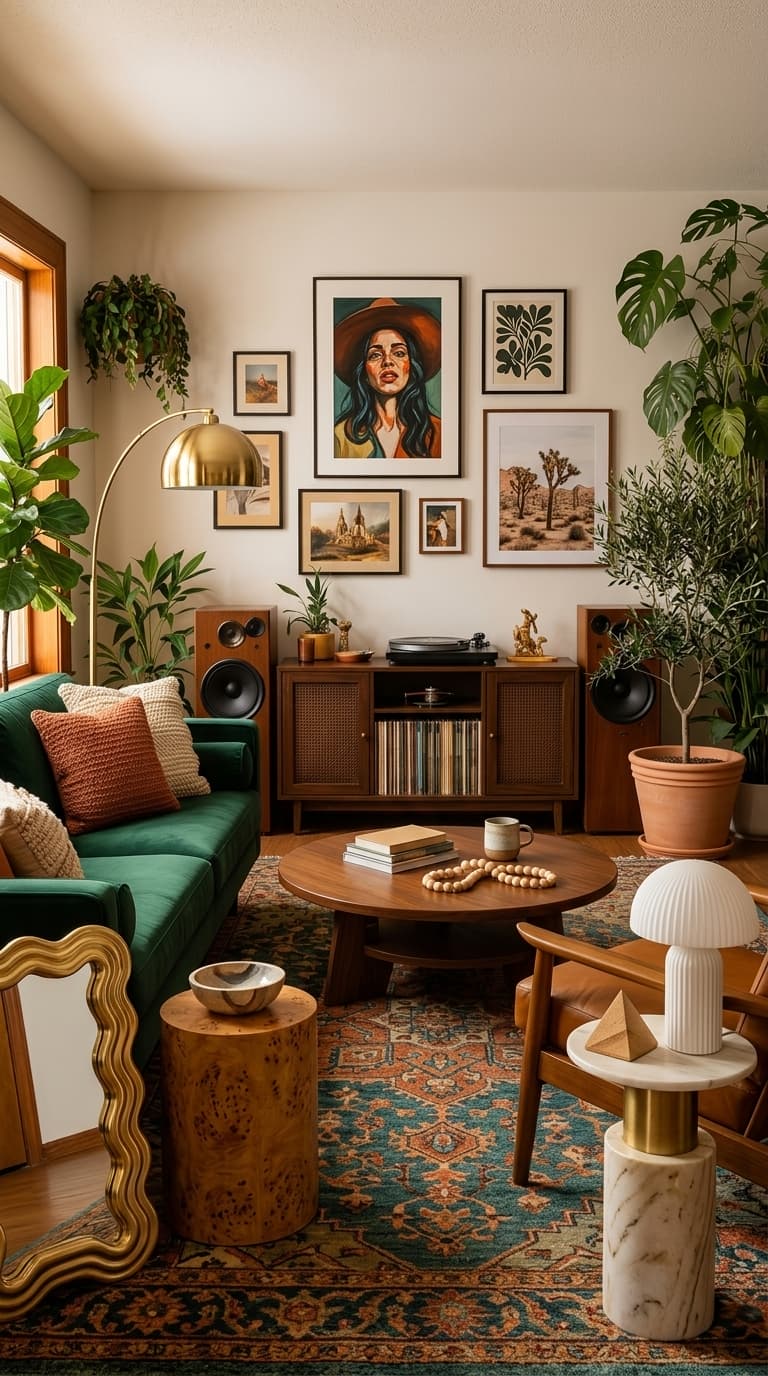
Transforming a blank wall into a captivating focal point is an art form in itself, and a well-curated gallery wall is a fantastic way to inject personality and style into your living room. The image showcases a thoughtfully arranged collection of framed artwork, ranging from portraits and landscapes to abstract botanical prints. This approach allows for a dynamic display that can evolve with your tastes, offering a more personal touch than a single large piece.
The process of building a gallery wall might seem daunting, but with a little planning and a clear vision, it can be an incredibly rewarding decorating project. It’s an opportunity to showcase your favorite art, photographs, or even decorative objects, creating a personalized statement that elevates your room's design. The arrangement in the image demonstrates how varying frame sizes and orientations can add visual interest, while the consistent spacing between pieces maintains a sense of order.
1. Selecting Your Art Pieces
The foundation of any successful gallery wall lies in the art you choose. In the provided image, the collection features a striking portrait as the central piece, flanked by smaller landscape and botanical prints. This mix offers variety in subject matter and style, creating visual depth. When selecting your own art, think about what speaks to you. This could include personal photographs, prints from your favorite artists, vintage posters, or even your own creations.
When choosing art, consider the emotional impact you want to achieve. The bold portrait in the image draws the eye, while the more serene landscapes offer a sense of calm. Think about the mood of your living room. If it's a space for relaxation, opt for calming colors and nature-inspired imagery. If it's a more energetic gathering space, bolder colors and abstract pieces might be more suitable.
2. Planning Your Layout
The arrangement of your gallery wall is just as important as the art itself. The image demonstrates a balanced layout, with a larger central piece and smaller pieces arranged around it. A common strategy is to start with your largest or most dominant piece and build outwards, or to establish a central anchor point. You can also create a grid-like structure for a more formal look, or opt for an asymmetrical, organic arrangement for a more relaxed feel.
Spacing is critical for a polished look. Aim for consistent spacing between frames, typically between 2 to 4 inches, depending on the overall size of your arrangement. The image shows relatively consistent spacing, which contributes to the organized appearance. When planning your layout, imagine a central horizontal or vertical line that your frames will align with, or use the edges of your largest piece as a guide. If you're creating an asymmetrical arrangement, ensure there's a visual balance.
3. Framing and Presentation
The frames you choose play a significant role in the overall aesthetic of your gallery wall. The image features a mix of dark frames that complement the wood tones in the room, creating a cohesive look. You can opt for matching frames for a unified and sophisticated appearance, or mix and match different styles and finishes for a more eclectic vibe. Consider the material and color of the frames – wood, metal, or painted finishes can all contribute to the mood.
Beyond traditional frames, consider alternative ways to present your art. The image uses standard framed prints, but you could also incorporate mirrors, shadow boxes for three-dimensional objects, or even floating shelves to display smaller pieces or decorative items. If you're framing photographs or prints that might fade, opt for UV-protective glass to preserve their quality. When hanging, ensure all pieces are level and securely fastened.
4. Hanging Your Gallery Wall
The actual hanging process requires precision and patience. Start by measuring and marking the exact spot for your first piece, usually the central or largest artwork. Use a level to ensure it's perfectly straight. For subsequent pieces, measure the distance from the first frame to maintain consistent spacing. A laser level can be a helpful tool for ensuring all pieces are aligned horizontally and vertically.
When hanging, consider the type of wall you have. Drywall typically requires anchors for anything heavier than a few pounds, while plaster walls might need specialized anchors. For very heavy pieces, consider locating wall studs for maximum support. If you're unsure about the best hardware for your walls, consult with a hardware store professional. Another tip is to use picture hanging strips for lighter frames, which can be a less invasive option and allow for easier adjustments.
5. Lighting Your Art
Proper lighting can dramatically enhance the impact of your gallery wall, making your chosen pieces pop. The image utilizes ambient room lighting, but consider adding dedicated art lighting for a more professional display. Track lighting or picture lights mounted above the frames can direct light onto the artwork, highlighting its details and colors. If you're using a floor lamp, like the one shown, position it strategically so its light falls on the gallery wall without creating glare.
When choosing lighting, consider the type of bulbs. LED bulbs are energy-efficient and come in various color temperatures, allowing you to select a light that best complements your artwork. A warmer light (around 2700K-3000K) can create a cozy ambiance, while a cooler light (around 4000K) might be better for showcasing vibrant colors. Avoid direct, harsh lighting that can cause glare or damage sensitive artwork over time. If natural light is abundant, be mindful of direct sunlight, which can fade colors.
6. Maintaining and Evolving Your Gallery Wall
A gallery wall isn't necessarily a static display; it can evolve with your changing tastes and new acquisitions. Periodically reassess your arrangement. Are there pieces you've outgrown? Have you found new art you'd like to incorporate? Don't be afraid to swap out prints, rearrange the layout, or add new elements. This keeps your display fresh and exciting. Dust your frames and artwork regularly to keep them looking their best.
To avoid clutter, ensure that the gallery wall doesn't overwhelm the rest of the room. The scale and density of the arrangement should be proportionate to the wall and the furniture. If your collection is extensive, consider breaking it up into smaller groupings on different walls. When adding new pieces, try to integrate them thoughtfully into the existing composition rather than just tacking them on.
- Gather all potential art pieces and frames before planning the layout.
- Measure your wall space and plan the overall dimensions of your gallery wall.
- Use painter's tape to mock up frame placements on the wall.
- Ensure consistent spacing (2-4 inches) between all framed pieces.
- Select appropriate hardware for your wall type and artwork weight.
- Consider adding accent lighting to highlight your curated art collection.